1. 设备树概念 1.1.设备树感性认识

1.2.DTS、DTB、DTC
DTS:设备树源码文件;DTB:将DTS编译后得到的二进制文件;DTC:DTS的编译工具,其源码在内核的scripts\dtc目录下。基于同样arm架构的CPU有很多,同一个CPU会制作很多配置不一的板子,如何正确的编译所选的板子的DTS文件呢?在内核的arch/arm/boot/dts/Makefile中:
dtb-$(CONFIG_ARCH_XXX) =xxx.dtbdtb-$(CONFIG_ARCH_XXX) =xxx-sip.dtbdtb-$(CONFIG_ARCH_XXX) =xxx.dtbdtb-$(CONFIG_ARCH_XXX) =xxx.dtb
例如xxxx的开发板,只要设置CONFIG_ARCH_xxx=y,所有用到这颗SOC的DTS都会编译成DTB。如果后续还用到了这颗SOC设计的开发板,只要新建一个DTS文件,并将对应名称的DTB文件名加到dtb-$(CONFIG_ARCH_xxx)中,在编译设备树时就会将DTS编译为二进制的DTB文件。
1.3.Device Tree语法
以下语法分析均以xxx.dts为例。
1.3.1. dtsi头文件
设备树的头文件扩展名为 .dtsi。以xxx.dts为例,其包含以下头文件。
#include”skeleton.dtsi”#includexxx.h”#include”xxx-clocks.dtsi”#include”xxx-pinctrl.dtsi”#include”xxx-camera.dtsi”
需要注意的是.dts文件不但可以引用.dtsi文件,还可以引用.h文件和其他的.dts文件。Q1:每一个.dtsi和.dts都有自己的根节点,但是一个设备树文件只允许有一个根节点,DTC如何处理?将根节点合并,保留最后一级的根节点。包含的头文件内容会被展开,展开的位置在/memory和/cpus之间。(存疑,只用xxx.dts编译过)
Q2:如果包含过程中有重复的compatible,DTC怎么处理?编译时不会报错,会生成两个compatible属性一样的节点。
1.3.2. 设备节点
设备树中的每一个节点都按照以下格式命名:
node-name@unit-address
node-name表示节点名称,它的长度范围应该是1~31个字符,可以由以下的字符组成:
字符说明0~9数字a-z小写字母A-Z大写字母,逗号(英文).句号(英文)_下划线(英文) 加号-减号
表 2-1节点名称的有效字符
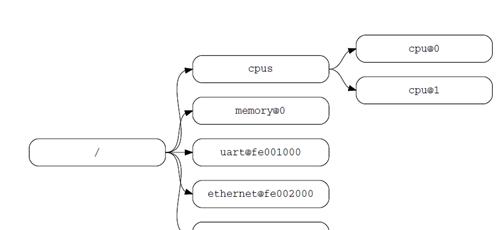 图 2-1节点名称示例
在图2-1中,节点名称为cpu的两个节点通过uint-address 0和1区分;节点名称为ethernet的两个节点通过uint-address fe002000和fe003000区分。在设备树中经常会看到以下设备名称:
watchdog:watchdog@04009800
冒号前的是节点标签(label),冒号后是节点名称。引入label的目的是方便访问节点,可以直接通过&label来访问这个节点。比如上述节点就可以使用&watchdog来访问。
1.3.2.1. 通用名称建议
节点的名称应该有些通用,反映设备的功能,而不是其精确的编程模型。如适用,名称应为以下选择之一:
??adc??accelerometer??atm??audio-codec??audio-controller??backlight:??bluetooth??bus??cache-controller??camera??can??charger??clock:??clock-controller??compact-flash??cpu??cpus??crypto??disk??display??dma-controller??dsp??eeprom??efuse:??mdio??memory??memory-controller??mmc??mmc-slot??mouse??nand-controller??nvram??oscillator??parallel??pc-card??pci??pcie??phy??pinctrl??pmic??pmu??port??ports??pwm1.3.2.2. 路径名称
通过指定从根节点到所需节点的完整路径(通过所有子节点),可以唯一识别devicetree中的节点。指定设备路径的约定是:
/node-name-1/node-name-2/…/node-name-N
例如,在图2-1中,到cpu#1的设备路径为:
/cpus/cpu@1
/为根节点,在保证完整路径明确的前提下,可以省略uint-address。
1.3.3. 属性
设备树中的每个节点都有描述节点特性的属性。属性由名称和值组成。
1.3.3.1. 属性名称
属性名称的长度范围应该是1~31个字符,可以由以下的字符组成:
字符说明0~9数字a-z小写字母A-Z大写字母,逗号(英文).句号(英文)_下划线(英文) 加号?问号(英文)##号(hash)
非标准属性名称应指定唯一的字符串前缀,例如股票代号,用于标识定义该属性的公司或组织的名称。示例:
xxx,pin-function=<6>;fsl,channel-fifo-lenlinux,network-indexibm,ppc-interrupt-server#s1.3.3.2. 属性值
属性值是包含与属性关联的信息的零或多个字节的数组。
1.3.3.3. 标准属性Compatible(兼容)属性名称兼容值值类型<stringlist>描述兼容属性值由定义设备特定编程模型的一个或多个字符串组成。客户端程序应使用此字符串列表选择设备驱动程序。该属性值包含一个从最特定到最通用的null终止字符串的串联列表。它们允许设备表达其与一系列类似设备的兼容性,可能允许单个设备驱动器与几个设备匹配。推荐的格式是“制造商,型号”,其中制造商是描述制造商名称的字符串(如股票代号)。
示例:
compatible=“fsl,mpc8641”,“ns16550”;
在此示例中,操作系统将首先尝试查找支持fsl,mpc8641-uartmpc8641的设备驱动程序。如果找不到驱动程序,然后,它将尝试定位受支持的更通用的ns16550设备类型驱动程序 。
一般驱动程序文件都会有个OF匹配表,此匹配表保存着一些compatible值,如果设备节点的 compatible属性值和OF匹配表中的任何一个值相等,那么就表示设备可以使用这驱动。比如在文件drvier/misc/memctrl.c中:
staticstructof_device_id_xxx_memctrl_of_match[]={{.compatible=”xxxx,memctrl”,},{},};
对应的,在arch/arm/boot/dts/xxx.dts中有:
memctrl:memctrl{compatible=”xxxx,memctrl”;reg=<0x0121B0000x1044>;clocks=<&sdram_bandw_clk>,<&mem_axi_clk>;clock-names=”sdram_bandwidth_clk”,”mem_axi_clk”;interrupts=<GIC_SPIINT_SDRAMIRQ_TYPE_LEVEL_HIGH>;interrupt-controller;#interrupt-cells=<1>;};Model(型号)属性名称模型值值类型描述指定设备的制造商型号。推荐的格式为:“制造商,型号”,其中制造商是描述制造商名称的字符串(如股票代号)。
示例:
model =“fsl,MPC8349EMITX”;Phandle(pointer handle)属性名称pointer handle值值类型描述phandle属性指定设备树中唯一节点的数字标识符。phandle属性值被需要引用与该属性关联的节点的其他节点使用。
示例:
pic@10000000{phandle=<1>;interrupt-controller;};
定义了1的phandle值。另一个设备节点可以引用phandle值为1的pic节点:
#address-cells=<1>;#size-cells=<1>;
示例:假设系统芯片中的设备包含两个寄存器块,SOC中偏移0x3000的32字节块和偏移0xFE00的256字节块。reg属性的编码如下(假设#address-cells和#size-cells值为1):
示例:
soc{compatible=”simple-bus”;#address-cells=<1>;#size-cells=<1>;ranges=<0x00xe00000000x00100000>;serial{device_type=”serial”;compatible=”ns16550″;reg=<0x46000x100>;clock-frequency=<0>;interrupts=<0xA0x8>;interrupt-parent=<&ipic>;};};
所有设备树文件均要包含一个根文件,并且所有设备树文件均应在根节点下存在以下节点:
1个/cpus节点至少一个/memory节点
使用说明:R = 必需,O = 可选,OR = 可选但推荐,SD = 参见定义,所有其他的标准属性均可接受,但可选
1.3.4.1. Root node
devicetree有一个单独的根节点,所有其他设备节点都是它的后代。根节点的完整路径为/。
设备树文件可能具有一个别名节点(/aliases),该节点定义一个或多个别名属性。别名节点应位于设备树的根节点,并且具有节点名称/别名。/aliases节点的每个属性都定义了一个别名。属性名称指定别名。属性值指定设备树中节点的完整路径。例如,属性serial0 = “/simple-bus@fe000000/serial@llc500″定义了别名serial0。别名的命名规则如下:
字符描述0-9数字a-z小写字母-破折号1.3.4.3. /memory节点
所有设备树都需要内存设备节点,并描述系统的物理内存布局。如果系统具有多个范围的内存,则可以创建多个内存节点,或者可以在单个内存节点的reg属性中指定范围。
/memory节点的属性要求如下:
在xxx.dts中
/chosen 节点不代表系统中的实际设备,而是描述了在运行时由系统固件选择或指定的参数。它应该是根节点的子节点。
属性名称使用说明类型定义bootargsO<string>指定程序的启动参数。如果不需要引导参数,则该值可能为空字符串stdout-pathO<string>指定到表示用于引导控制台输出的设备的节点的完整路径。如果包含’:’,则它将终止路径。该值可以是别名。stdin-pathO<string>指定到表示用于引导控制台输入的设备的节点的完整路径。如果包含’:’,则它将终止路径。该值可以是别名。
示例:
chosen{bootargs=”root=/dev/nfsrwnfsroot=192.168.1.1console=ttyS0,115200”;};1.3.4.5. /cpus节点属性
所有设备树均需要/cpus/cpu节点。它并不代表系统中的真实设备,而是作为代表系统cpu的子cpu节点的容器。
属性名称使用说明类型定义device_typeR<string>值应为“cpu”regR<prop-encoded-array>它为CPU节点表示的CPU/线程定义了唯一的CPU/线程ID。如果CPU支持多线程,则reg是一个数组,每个线程具有一个元素。clock-frequencyR<prop-encoded-array>以Hz为单位指定CPU的当前时钟速度,格式可以是,或timebase-frequencyR<prop-encoded-array>指定更新时基的当前频率statusSD<string>此属性应存在于对称多进程(SMP)CPU的节点中 配置。”okay”:CPU正在运行;”disable”:CPU处于静止状态。1.3.5. 中断映射
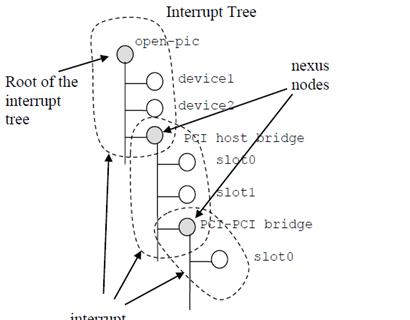
在设备树中,存在逻辑中断树,该逻辑中断树表示平台硬件中断的层次结构和路由。在设备树中,使用interrupt-parent属性表示中断源与中断控制器的物理连线。代表产生中断的设备节点包含一个中断父属性,该属性具有一个虚拟值,指向给设备的中断所路由到的设备(通常是中断控制器)。
如果产生中断的设备不具有中断父属性,则假定其中断父节点为其设备父节点。每个中断产生设备都包含一个中断属性,该属性的值描述该设备的一个或多个中断源。每个源都用称为中断描述符表示。中断描述符的格式和含义是特定于中断域的,即,取决于中断域根节点上节点的属性。中断域的根使用#interrupt-cells属性定义对中断描述符进行编码所需的值数量。
中断域是解释中断描述符的上下文。中断域的根可以是中断控制器(interrupt controller)或中断连接器(interrupt nexus):
中断控制器是物理设备,需要一个驱动程序来处理通过它路由的中断。它还可能级联到另一个中断域。中断控制器由设备树中该节点上的interrupt-controller指定。中断连接器定义了一个中断域和另一个中断域之间的转换。翻译基于特定领域和总线的信息。使用interrupt-map属性在域之间进行转换。例如,PCI控制器设备节点可以是一个中断连接器,定义从PCI中断命名空间(INTA、INTB等)到具有中断请求(IRQ)编号的中断控制器的转换。
 1.3.5.1. Interrupts属性名称interrupts值类型<prop-encoded-array>编码为任意数量的中断描述符描述设备节点的中断属性定义设备生成的中断。interrupts属性的值由任意数量的中断描述符组成。中断描述符的格式由中断域根定义。
示例:
interrupts=<GIC_SPIINT_DMAIRQ_TYPE_LEVEL_HIGH>;1.3.5.2. interrupt-parent属性名称interrupt-parent值类型<phandle>描述由于中断树中节点的层次结构可能与device tree不匹配,因此interrupt-parent属性可用于明确中断父级的定义。该值是中断父级的phandle。如果设备缺少此属性,则假定其中断父级为其设备树父级。
示例:
interrupt-parent=<&gpe>;1.3.5.3. interrupts-extended属性名称interrupts-extended值类型<phandle>描述扩展的中断属性列出了设备产生的中断。当设备连接到多个中断控制器时,应该使用interrupts-extended代替interrupts,因为它会在每一个中断描述符编码一个父代phandle
示例:
interrupts-extended=<&pic0xA8>,<&gic0xda>;1.3.5.4. #interrupt-cells属性名称#interrupt-cells值类型<u32>描述#interrupt-cells属性定义对中断域的中断描述符进行编码所需的单元数量1.3.5.5. interrupt-controller属性名称interrupt-controller值类型<empty>描述中断控制器属性的存在将节点定义为中断控制器节点。1.4.Device Tree binary格式
Devicetree Blob (DTB)格式是Devicetree数据的平面二进制编码。它用来在软件程序之间交换设备数据。例如,在引导操作系统时,固件将向操作系统内核传递一个DTB。
DTB格式将devicetree数据编码为一个单一的、线性的、无指针的数据结构。它由一个小标题组成,接下来是三个大小可变的部分:内存保留块、结构块和字符串块这些应该按照这个顺序出现在扁平的devicetree中。
1.4.1. dt_header
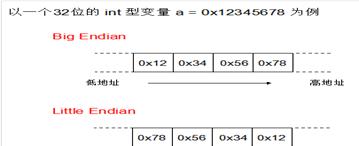
设备树的头部是由以下C结构体定义的。所有字段都是32位整数,以big-endian格式存储。
structfdt_header{此字段应包含值0xd00dfeed(big-endian)uint32_tmagic;/*magicwordFDT_MAGIC*/此字段应包含设备数据结构的总大小(字节)。该大小应包含结构的所有部分:报头、内存预留块、结构块和字符串块,以及块之间或最终块之后的自由空间间隙。uint32_ttotalsize;/*totalsizeofDTblock*/此字段应包含结构块从标题开始的字节偏移uint32_toff_dt_struct;/*offsettostructure*/此字段应包含从标题开始的字符串块的字节偏移量uint32_toff_dt_strings;/*offsettostrings*/此字段应包含从标题开始的内存保留块的字节偏移量uint32_toff_mem_rsvmap;/*offsettomemoryreservemap*/此字段应包含设备数据结构的版本uint32_tversion;/*formatversion*/此字段应包含设备所用版本向后兼容的最低版本数据结构uint32_tlast_comp_version;/*lastcompatibleversion*//*version2fieldsbelow*/此字段应包含系统引导CPU的物理ID。它应与设备树中CPU节点的reg属性中给定的物理ID相同uint32_tboot_cpuid_phys;/*WhichphysicalCPUidwe’rebootingon*//*version3fieldsbelow*/此字段应包含字符串块部分的字节长度uint32_tsize_dt_strings;/*sizeofthestringsblock*//*version17fieldsbelow*/此字段应包含结构块部分的字节长度uint32_tsize_dt_struct;/*sizeofthestructureblock*/};1.4.2. memory reservation block
内存保留块向客户端程序提供物理内存中被保留的区域的列表,这些内存不用于一般的内存分配,目的是保护重要的数据结构不被客户端程序覆盖。这个区域包括了若干的reserve memory描述符。每个reserve memory描述符是由address和size组成。其中address和size都是用U64来描述:
structfdt_reserve_entry{uint64_taddress;uint64_tsize;};1.4.3. Structure block
结构块描述了设备树本身的结构和内容。它由若干的分片组成,每个分片开始位置都是保存了令牌(token),以此来描述该分片的属性和内容。
FDT_BEGIN_NODE (0x00000001):该token描述了一个node的开始位置,紧挨着该token的就是node name(包括unit address)FDT_END_NODE (0x00000002):该token描述了一个node的结束位置FDT_PROP (0x00000003):该token描述了一个property的开始位置,该token之后是两个u32的数据。它们之后就是长度为len的具体的属性值数据。struct{uint32_tlen;表示该property value data的size。uint32_tnameoff;表示该属性字符串在devicetreestringsblock的偏移值}FDT_NOP (0x00000004):被解析设备树的程序忽略,可用于覆盖其他属性,以删除它FDT_END (0x00000009):标记结构块的结束
所以,一个DTB的结构块可能如下:(optionally)anynumberofFDT_NOPtokensFDT_BEGIN_NODEtoken:–node’sname–paddingsForeachpropertyofthenode:–FDT_NOP(optionally)–FDT_PROPtoken–propertyallchildnodesinthisformat(optionally)anynumberofFDT_NOPtokensFDT_END_NODEtoken1.4.4. Strings Block
定义了各个node中使用的属性的字符串表。由于很多属性会出现在多个node中,因此,所有的
属性字符串组成了一个string block。这样可以压缩DTB的size。
1.5.Linux解析设备树
设备树描述了设备的详细信息,这些信息包括数字类型的、字符串类型的、数组类型的,我们在编写驱动时需要去获取这些信息。Linux内核提供一系列以of_开头的函数来获取设备树信息,这些函数的原型都定义在include/linux/of.h中。设备以节点的形式挂在设备树上,Linux内核使用device_node结构体来描述一个节点,其定义在include/linux/of.h中:
structdevice_node{constchar*name;devicenodenameconstchar*type;对应device_type的属性phandlephandle;对应该节点的phandle属性constchar*full_name;从“/”开始的,表示该node的fullpathStructproperty*properties;该节点的属性列表如果需要删除某些属性,kernel并非真的删除,而是挂入到deadprops的列表structproperty*deadprops;/*removedproperties*/parent、child以及sibling将所有的devicenode连接起来Structdevice_node*parent;Structdevice_node*child;Structdevice_node*sibling;通过该指针可以获取相同类型的下一个nodeStructdevice_node*next;/*nextdeviceofsametype*/通过该指针可以获取nodegloballist下一个nodestructdevice_node*allnext;/*nextinlistofallnodes*/structkobjectkobj;unsignedlong_flags;void*data;#ifdefined(CONFIG_SPARC)constchar*path_component_name;unsignedintunique_id;structof_irq_controller*irq_trans;#endif};1.5.1. 查找节点的 OF函数1.5.1.1. of_find_node_by_name
功能 :
Find a node by its “name” property
函数
structdevice_node*of_find_node_by_name(structdevice_node*from,constchar*name)
参数 :
@from:开始查找的节点,如果为NULL表示从根节点开始查找整个设备树。@name::要查找的节点名字。
返回值:
找到的节点,如果为NULL表示查找失败。
1.5.1.2. of_find_node_by_path
功能 :
Find a node matching a full OF path
函数 :
structdevice_node*of_find_node_by_path(constchar*path)
参数 :
@path: 完整的匹配路径
返回值 :
找到的节点,如果为NULL表示查找失败。
1.5.1.3. of_find_node_by_type
功能
Find a node by its “device_type” property
函数
structdevice_node*of_find_node_by_type(structdevice_node*from,constchar*type)
参数
@from:开始查找的节点,如果为NULL表示从根节点开始查找整个设备树@type:要查找的节点类型
返回值
找到的节点,如果为NULL表示查找失败。
1.5.1.4. of_find_compatible_node
功能
通过device_type和compatible查找指定节点
函数
structdevice_node*of_find_compatible_node(structdevice_node*from,constchar*type,constchar*compatible)
参数
@from:开始查找的节点,如果为NULL表示从根节点开始查找整个设备树@type:要查找的节点device_type属性@compatible:节点的compatible属性列表
返回值
找到的节点,如果为NULL表示查找失败。
1.5.1.5. of_find_node_with_property
功能
通过属性名查找指定节点
函数
structdevice_node*of_find_node_with_property(structdevice_node*from,constchar*prop_name)
参数
@from:开始查找的节点,如果为NULL表示从根节点开始查找整个设备树@type:要查找的节点属性名称
返回值
找到的节点,如果为NULL表示查找失败。
1.5.2. 查找父 /子节点的 OF函数1.5.2.1. of_get_parent
功能
函数用于获取指定节点的父节点(如果有父节点的话 )
函数
structdevice_node*of_get_parent(conststructdevice_node*node)
参数
@node:要查找父节点的节点
返回值
找到的父节点
1.5.2.2. of_get_next_available_child
功能
获取子节点,并跳过status = “disabled”的节点
函数
structdevice_node*of_get_next_available_child(conststructdevice_node*node,structdevice_node*prev)
参数
@node:父节点@prev:当前父节点的上一个子节点,如果为空,则获取第一个子节点
返回值
找到的子节点
1.5.3. 提取属性值的 OF函数
Linux内核使用struct property来保存节点的属性,其定义在/include/linux/of.h中:
structproperty{char*name;属性的名称intlength;属性的长度void*value;属性的值structproperty*next;下一个属性unsignedlong_flags;unsignedintunique_id;structbin_attributeattr;};1.5.3.1. of_find_property
功能
寻找指定的属性
函数
structproperty*of_find_property(conststructdevice_node*np,constchar*name,int*lenp)
参数
@np:设备节点@name:属性名称@lenp:属性的字节数
返回值
找到的属性
1.5.3.2. 读取属性中u8、u16、u32和u64类型的数组数据
当设置sz为1时,就是读取一个数据,Linux内核也是这么封装的。
intof_property_read_u8_array(conststructdevice_node*np,constchar*propname,u8*out_values,size_tsz)intof_property_read_u16_array(conststructdevice_node*np,constchar*propname,u16*out_values,size_tsz)intof_property_read_u32_array(conststructdevice_node*np,constchar*propname,u32*out_values,size_tsz)intof_property_read_u64(conststructdevice_node*np,constchar*propname,u64*out_value)1.5.3.3. of_property_read_string
功能
找到并读取属性字符串
函数
intof_property_read_string(structdevice_node*np,constchar*propname,constchar**out_string)
参数
@np:设备节点@propname:属性名称@out_string:读取的字符串
返回值
0:读取成功-EINVAL:属性不存在-ENODATA:属性没有这个值-EILSEQ:字符串不是以空字符’\0’结尾 2. 设备树解析流程 2.1.内核启动并获取设备树
/***__unflatten_device_tree-createtreeofdevice_nodesfromflatblob**unflattensadevice-tree,creatingthe*treeofstructdevice_node.Italsofillsthe”name”and”type”*pointersofthenodessothenormaldevice-treewalkingfunctions*canbeused.*@blob:Theblobtoexpand*@mynodes:Thedevice_nodetreecreatedbythecall*@dt_alloc:Anallocatorthatprovidesavirtualaddresstomemory*fortheresultingtree*/staticvoid__unflatten_device_tree(structboot_param_header*blob,structdevice_node**mynodes,void*(*dt_alloc)(u64size,u64align))
所以,现在为止,我们得到了一个名为of_allnodes的struct *device_node,它指向了设备树展开后的device_node树,后续的操作都是基于device_node树。
2.2.创建platform_device
内核从启动到创建设备的过程大致如下:在do_initcalls中会传递level给do_initcall_level来调用不同层次的初始化函数,level的对应关系见linux-3.10/include/linux/init.h 第196行。在这个初始化过程中,会调用一个customize_machine的函数。
2.3.Platform driver注册流程
此节分析Platform driver的注册流程,以memctrl驱动的注册为例分析。关于系统调用驱动初始化函数的流程分析,参考自动初始化机制章节。本章节分析从设备驱动文件的xxx_init函数开始分析。
2.3.1. struct platform_driver
platform_driver是在device_driver之上的一层封装,其结构如下:
structplatform_driver{int(*probe)(structplatform_device*);探测函数int(*remove)(structplatform_device*);驱动卸载时执行void(*shutdown)(structplatform_device*);关机时执行函数int(*suspend)(structplatform_device*,pm_message_tstate);挂起函数int(*resume)(structplatform_device*);恢复函数structdevice_driverdriver;管理的driver对象conststructplatform_device_id*id_table;匹配时使用};2.3.2. struct device_driver
struct device_driver是系统提供的基本驱动结构:
structdevice_driver{constchar*name;驱动名称structbus_type*bus;所属总线structmodule*owner;模块拥有者constchar*mod_name;内建的模块使用boolsuppress_bind_attrs;是否绑定到sysfsconststructof_device_id*of_match_table;设备树匹配表conststructacpi_device_id*acpi_match_table;ACPI匹配表int(*probe)(structdevice*dev);探测设备int(*remove)(structdevice*dev);与设备脱离时调用void(*shutdown)(structdevice*dev);在关机时关闭设备int(*suspend)(structdevice*dev,pm_message_tstate);使设备进入睡眠模式调用int(*resume)(structdevice*dev);唤醒设备时调用conststructattribute_group**groups;自动创建的默认属性组conststructdev_pm_ops*pm;设备的功耗管理structdriver_private*p;驱动的私有数据};2.3.3. platform_driver_register
Platform_driver的注册接口是platform_driver_register,其定义如下:
intplatform_driver_register(structplatform_driver*drv){drv->driver.bus=&platform_bus_type;设置总线类型if(drv->probe)确认定义了probe函数drv->driver.probe=platform_drv_probe;里面实际调用的是drv的probe函数if(drv->remove)drv->driver.remove=platform_drv_remove;if(drv->shutdown)drv->driver.shutdown=platform_drv_shutdown;returndriver_register(&drv->driver);}
platform_driver_register接口是为注册总线驱动做一些准备工作,定义了总线类型,设置了driver的部分接口,最后driver_register会向总线注册驱动
2.3.4. driver_registerintdriver_register(structdevice_driver*drv){intret;structdevice_driver*other;BUG_ON(!drv->bus->p);if((drv->bus->probe&&drv->probe)||(drv->bus->remove&&drv->remove)||(drv->bus->shutdown&&drv->shutdown))printk(KERN_WARNING”Driver’%s’needsupdating-pleaseuse””bus_typemethods\n”,drv->name);other=driver_find(drv->name,drv->bus);检查驱动是否已经注册if(other){printk(KERN_ERR”Error:Driver’%s’isalreadyregistered,””aborting…\n”,drv->name);return-EBUSY;}ret=bus_add_driver(drv);driver_register的主要工作放在了这里if(ret)returnret;ret=driver_add_groups(drv,drv->groups);主要是在sysfs添加驱动属性if(ret){bus_remove_driver(drv);returnret;}kobject_uevent(&drv->p->kobj,KOBJ_ADD);涉及到uevent,暂时不分析returnret;}2.3.5. bus_add_driver
由以上分析可知,驱动的注册,重点在bus_add_driver()函数,它会向总线添加驱动:
Drivers/base/bus.cintbus_add_driver(structdevice_driver*drv){structbus_type*bus;structdriver_private*priv;包含与驱动相关的kobject和klist结构interror=0;bus=bus_get(drv->bus);获取设备所属的总线类型if(!bus)return-EINVAL;pr_debug(“bus:’%s’:adddriver%s\n”,bus->name,drv->name);priv=kzalloc(sizeof(*priv),GFP_KERNEL);if(!priv){error=-ENOMEM;gotoout_put_bus;}klist_init(&priv->klist_devices,NULL,NULL);priv->driver=drv;drv->p=priv;priv->kobj.kset=bus->p->drivers_kset;error=kobject_init_and_add(&priv->kobj,&driver_ktype,NULL,”%s”,drv->name);if(error)gotoout_unregister;klist_add_tail(&priv->knode_bus,&bus->p->klist_drivers);if(drv->bus->p->drivers_autoprobe){如果设置了自动探测error=driver_attach(drv);if(error)gotoout_unregister;}module_add_driver(drv->owner,drv);error=driver_create_file(drv,&driver_attr_uevent);if(error){printk(KERN_ERR”%s:ueventattr(%s)failed\n”,__func__,drv->name);}error=driver_add_attrs(bus,drv);if(error){/*Howthehelldowegetoutofthispickle?Giveup*/printk(KERN_ERR”%s:driver_add_attrs(%s)failed\n”,__func__,drv->name);}if(!drv->suppress_bind_attrs){error=add_bind_files(drv);if(error){/*Ditto*/printk(KERN_ERR”%s:add_bind_files(%s)failed\n”,__func__,drv->name);}}return0;out_unregister:kobject_put(&priv->kobj);kfree(drv->p);drv->p=NULL;out_put_bus:bus_put(bus);returnerror;}2.3.6. driver_attach
driver_attach会尝试绑定设备和驱动。编译总线上的所有设备,然驱动挨个尝试匹配,如果driver_probe_device()返回0且@dev->driver被设置,就代表找到了一对兼容的设备驱动。
intdriver_attach(structdevice_driver*drv){returnbus_for_each_dev(drv->bus,NULL,drv,__driver_attach);}EXPORT_SYMBOL_GPL(driver_attach);2.3.7. __driver_attach
对于每一个总线的设备,driver_attach都会调用__driver_attach来尝试与驱动匹配。
staticint__driver_attach(structdevice*dev,void*data){structdevice_driver*drv=data;/**Lockdeviceandtrytobindtoit.Wedroptheerror*hereandalwaysreturn0,becauseweneedtokeeptrying*tobindtodevicesandsomedriverswillreturnanerror*simplyifitdidn’tsupportthedevice.**driver_probe_device()willspitawarningifthere*isanerror.*/if(!driver_match_device(drv,dev))匹配设备和驱动,这里调用的是platform_matchreturn0;if(dev->parent)/*NeededforUSB*/device_lock(dev->parent);device_lock(dev);设置互斥锁,防止其他进程访问设备资源if(!dev->driver)如果设备没有驱动,则为设备探测驱动,这个函数与注册设备调用的是同一个函数driver_probe_device(drv,dev);device_unlock(dev);if(dev->parent)device_unlock(dev->parent);return0;}
driver_probe_device里调用really_probe函数,并在really_probe中调用驱动文件中的probe函数,对于memctrl驱动而言,就是xxxx_memctrl_probe函数。至此,platfprm driver就注册好了。
2.4.Platform Bus的匹配原则
由以上的代码分析得知,注册platform device时,会调用__device_attach -> driver_match_device,注册platform driver时,会调用__driver_attach -> driver_match_device,也就是说设备和驱动都会调用到这个函数:
staticinlineintdriver_match_device(structdevice_driver*drv,structdevice*dev){returndrv->bus->match?drv->bus->match(dev,drv):1;}
drv->bus->match,这是驱动绑定的总线提供的匹配函数,这里注册的是platform总线设备,而platform总线的定义参考3.2.6 platform_bus_type。Platform对应的match函数为:platform_match:
staticintplatform_match(structdevice*dev,structdevice_driver*drv){structplatform_device*pdev=to_platform_device(dev);structplatform_driver*pdrv=to_platform_driver(drv);/*AttemptanOFstylematchfirst*/if(of_driver_match_device(dev,drv))return1;/*ThentryACPIstylematch*/if(acpi_driver_match_device(dev,drv))return1;/*Thentrytomatchagainsttheidtable*/if(pdrv->id_table)returnplatform_match_id(pdrv->id_table,pdev)!=NULL;/*fall-backtodrivernamematch*/return(strcmp(pdev->name,drv->name)==0);}2.4.1. of_driver_match_device
根据驱动的of_match_table判断是否有驱动与之匹配。对memctrl驱动而言,其of_match_table如下:
staticstructof_device_idxxxx_memctrl_of_match[]={{.compatible=”xxxx,memctrl”,},{},};
of_driver_match_device的执行流程如下:
所以重点应该在__of_match_node函数:
2.4.1.1. __of_match_nodestaticconststructof_device_id*__of_match_node(conststructof_device_id*matches,conststructdevice_node*node){if(!matches)returnNULL;while(matches->name[0]||matches->type[0]||matches->compatible[0]){intmatch=1;if(matches->name[0])查找名字match&=node->name&&!strcmp(matches->name,node->name);if(matches->type[0])查找类型match&=node->type&&!strcmp(matches->type,node->type);if(matches->compatible[0])查找属性,检测节点的compatible是否与驱动的一致match&=__of_device_is_compatible(node,matches->compatible);if(match)returnmatches;matches ;}returnNULL;} 3. 使用设备资源 4. 自动初始化机制 4.1.编译到内核4.1.1. module_init宏展开
Linux中每一个模块都有一个module_init函数,并且有且只有一个,其定义如下:
/***module_init()-driverinitializationentrypoint*@x:functiontoberunatkernelboottimeormoduleinsertion**module_init()willeitherbecalledduringdo_initcalls()(if*builtin)oratmoduleinsertiontime(ifamodule).Therecanonly*beonepermodule.*/#definemodule_init(x)__initcall(x);__initcall(x)定义如下:#define__initcall(fn)device_initcall(fn)
device_initcall(fn)定义如下:
#definedevice_initcall(fn)__define_initcall(fn,6)
__define_initcall的定义如下:
/*initcallsarenowgroupedbyfunctionalityintoseparate*subsections.Orderinginsidethesubsectionsisdetermined*bylinkorder.*Forbackwardscompatibility,initcall()putsthecallin*thedeviceinitsubsection.**The`id’argto__define_initcall()isneededsothatmultipleinitcalls*canpointatthesamehandlerwithoutcausingduplicate-symbolbuilderrors.*/#define__define_initcall(fn,id)\staticinitcall_t__initcall_##fn##id__used\__attribute__((__section__(“.initcall”#id”.init”)))=fn
Initcalls现在按照功能分组到单独的子部分。子部分内部的顺序由链接顺序决定。为了向后兼容,initcall()将调用放到device init小节中。需要定义initcall()的’id’参数,以便多个initcall可以指向同一个处理程序,而不会导致重复符号构建错误。若不理解上述代码的用法,可以参考__attribute__的section用法和C语言宏定义中#和##的用法。所以将__define_initcall展开将会是下面的内容:
假设__define_initcall(led_init,6)Staticinitcall_t__initcall_led_init6__used\__attribute__((__section__(“.initcall6.init”)))=led_init
即是定义了一个类型为initcall_t的函数指针变量__initcall_led_init6,并赋值为led_init,该变量在链接时会链接到section(.initcall6.init)。
4.1.2. 链接脚本
在linux3.10/arch/arm/kernel/vmlinux.lds.S中:
……SECTIONS/*line54*/{…….init.data:{/*line202*/#ifndefCONFIG_XIP_KERNELINIT_DATA#endifINIT_SETUP(16)INIT_CALLSCON_INITCALLSECURITY_INITCALLINIT_RAM_FS}……}
在linux3.10/include/asm-generic/vmlinux.lds.h中:
#defineVMLINUX_SYMBOL(x)__VMLINUX_SYMBOL(x)#define__VMLINUX_SYMBOL(x)x……/*line664*/#defineINIT_CALLS_LEVEL(level)\VMLINUX_SYMBOL(__initcall##level##_start)=.;\*(.initcall##level##.init)\*(.initcall##level##s.init)\#defineINIT_CALLS\VMLINUX_SYMBOL(__initcall_start)=.;\*(.initcallearly.init)\INIT_CALLS_LEVEL(0)\INIT_CALLS_LEVEL(1)\INIT_CALLS_LEVEL(2)\INIT_CALLS_LEVEL(3)\INIT_CALLS_LEVEL(4)\INIT_CALLS_LEVEL(5)\INIT_CALLS_LEVEL(rootfs)\INIT_CALLS_LEVEL(6)\INIT_CALLS_LEVEL(7)\VMLINUX_SYMBOL(__initcall_end)=.;……
所以 INIT_CALLS_LEVEL(6)会展开为:
__initcall6_start=.;*(.initcall6.init)*(.initcall6s.init)
所以__initcall_led_init6会链接到
section(.initcall6.init)4.1.3. 初始化
内核启动流程为:
do_initcall_level的主要内容如下:
/*linux3.10/init/main.cline744*/staticvoid__initdo_initcall_level(intlevel){…..for(fn=initcall_levels[level];fn<initcall_levels[level 1];fn )do_one_initcall(*fn);}
由代码可知,内核会依次调用level段存储的初始化函数。比如对于模块来说level等于6。
4.2.动态加载的模块(.ko)4.2.1. Module_init展开
如果设置为编译成动态加载的模块(.ko),module_init的展开形式与编译到内核不一样。
/*Eachmodulemustuseonemodule_init().*/#definemodule_init(initfn)\staticinlineinitcall_t__inittest(void)\检查定义的函数是否符合initcall_t类型{returninitfn;}\intinit_module(void)__attribute__((alias(#initfn)));
4.2.2. *mod.c文件
编译成module的模块都会自动产生一个*.mod.c的文件,例如:
structmodule__this_module__attribute__((section(“.gnu.linkonce.this_module”)))={.name=KBUILD_MODNAME,.init=init_module,#ifdefCONFIG_MODULE_UNLOAD.exit=cleanup_module,#endif.arch=MODULE_ARCH_INIT,};
即定义了一个类型为module的全局变量__this_module,其成员.init就是上文由module_init定义的init_module变量。并且__this_module会被链接到
section(“.gnu.linkonce.this_module”)。
4.2.3. 动态加载
insmod是busybox提供的用户层命令:路径busybox/modutils/ insmod.c
insmod_mainbb_init_moduleinit_module
路径busybox/modutils/modutils.c:
#defineinit_module(mod,len,opts).\syscall(__NR_init_module,mod,len,opts)该系统调用对应内核层的sys_init_module函数
路径:kernel/module.c
SYSCALL_DEFINE3(init_module,…)//加载模块的ko文件,并解释各个section,重定位mod=load_module(umod,len,uargs);//查找section(“.gnu.linkonce.this_module”)modindex=find_sec(hdr,sechdrs,secstrings,”.gnu.linkonce.this_module”);//找到Hello_module.mod.c定义的module数据结构mod=(void*)sechdrs[modindex].sh_addr;if(mod->init!=NULL)ret=do_one_initcall(mod->init);//调用initfn.4.3.__attribute__的section用法
__define_initcall使用了gcc的 __attribute__众多属性中的section子项,其使用方式为:
__attribute__((__section__(“section_name”)))
其作用是将作用的函数或数据放入指定的名为”section_name”的段。
4.4. C语言宏定义中#和##的用法4.4.1. 一般用法
我们使用#把宏参数变为一个字符串。
#definePRINT(FORMAT,VALUE)\printf(“Thevalueof”#VALUE”is”FORMAT”\n”,VALUE)
调用:printf(“%d”,x 3); –> 打印:The value of x 3 is 20
这是因为”The value of”#VALUE”is ” FORMAT”\n”实际上是包含了”The value of “,#VALUE,”is “,FORMAT,”\n” 五部分字符串,其中VALUE和FORMAT被宏参数的实际值替换了。
用##把两个宏参数贴合在一起
#defineADD_TO_SUM(sum_number,val)sum##sum_bumber =(val)
调用:ADD_TO_SUM(2,100); –> 打印:sum2 =(100)
需要注意的是凡宏定义里有用’#’或’##’的地方宏参数是不会再展开。
4.4.2. ‘#’和’##’的一些应用特例合并匿名变量名#define___ANONYMOUS1(type,var,line)typevar##line#define__ANONYMOUS0(type,line)___ANONYMOUS1(type,_anonymous,line)#defineANONYMOUS(type)__ANONYMOUS0(type,__LINE__)
例:ANONYMOUS(static int); 即 static int _anonymous70; 70表示该行行号;第一层:ANONYMOUS(static int); –> __ANONYMOUS0(static int, LINE);
第二层: –> ___ANONYMOUS1(static int, _anonymous, 70);
第三层: –> static int _anonymous70;
即每次只能解开当前层的宏,所以__LINE__在第二层才能被解开;
填充结构#defineFILL(a){a,#a}enumIDD{OPEN,CLOSE};typedefstructMSG{IDDid;constcharmsg;}MSG;MSG_msg[]={FILL(OPEN),FILL(CLOSE)};
相当于:
MSG_msg[]={{OPEN,OPEN},{CLOSE,CLOSE}};记录文件名#define_GET_FILE_NAME(f)#f#defineGET_FILE_NAME(f)_GET_FILE_NAME(f)staticcharFILE_NAME[]=GET_FILE_NAME(__FILE__);得到一个数值类型所对应的字符串缓冲大小#define_TYPE_BUF_SIZE(type)sizeof#type#defineTYPE_BUF_SIZE(type)_TYPE_BUF_SIZE(type)charbuf[TYPE_BUF_SIZE(INT_MAX)];–charbuf[_TYPE_BUF_SIZE(0x7fffffff)];–charbuf[sizeof0x7fffffff];
这里相当于:
charbuf[11];- END –